Kohacon18 and contributing to Koha

One of my key takeaways from Kohacon18 in Portland, Oregon, USA was that I shouldn’t expect everyone else to have the same development and testing workflow as me.

Often, I will work directly on dev and test Linux servers, rather than working on a workstation, when I’m working on Koha. This has some advantages. For instance, if you just need to connect and relay commands to a server instead of doing work on the workstation, you can use cheap/low-end hardware. It also lets you work as close to your real production environment as possible, which will make deployments safer and smoother. However, my servers are very different to those used by other Koha contributors and users around the world. Thus, the setup instructions and test plans I write for my servers won’t necessarily translate that well to anyone else in the Koha community.

As a result, I should be writing (or at least testing) my community contributions using a community tool like kohadevbox or koha-testing-docker. These tools allow anyone in the world to create identical development/testing environments which they can use for developing and testing patches. At Kohacon18, I rewrote some setup instructions and test plans for use with kohadevbox, and they wound up being very different to what I wrote when I wrote for my own servers. And this was a very good thing, because it meant that other people could actually test my, fairly complex, contributions!

I’m using a Windows 10 workstation, so I can use Virtualbox and Vagrant with kohadevbox or I can use Docker for Windows with koha-testing-docker. Unfortunately, I can’t use both at the same time. Docker for Windows requires use of Hyper-V, which is incompatible with Virtualbox/VMware. Swapping between the different types of hypervisors requires a reboot. I rely on Virtualbox/VMware for other projects beyond Koha as well, so swapping back and forth – especially with reboots – is not that feasible for me. While I really like Docker and find koha-testing-docker to be an excellent tool, I think kohadevbox will be the best solution for me for now. I hope that this isn’t always the case, and I think I will try to Dockerize some of my other projects in the future, but right now isn’t that time.

I’ve used kohadevbox in the past, but it’s been a while, so I’m re-downloading Virtualbox, Vagrant, and Git for Windows to make sure that I have the latest versions possible. Once I have these dependencies installed, I’ll follow the rest of the instructions at https://gitlab.com/koha-community/kohadevbox and then I should have a tool for easily contributing and testing patches for the Koha community.

Playing with Arduino and 433mhz receivers/transmitters (and Docker)

Back in 2016, I bought a wireless doorbell, but I didn’t want to use the base with its loud “ding dong” song. I wanted to use an Arduino with a 433mhz radio frequency receiver to capture the wireless doorbell signal and do something else with it: send a SMS, send an email, light up a bright red LED, do anything except make a loud annoying sound.

At some point, I bought a 433mhz receiver from Jaycar: https://www.jaycar.com.au/wireless-modules-receiver-433mhz/p/ZW3102, but I didn’t do anything with it.

Fast forward to the present. A friend of my loans me a MX-RM-5V 433mhz receiver and a transmitter, which look a lot like the ones from this tutorial: https://www.liwen.id.au/arduino-rf-codes/

I try following the tutorial, but the rc-switch library doesn’t output anything for my doorbell signal. I do a bit of Googling and find a fork of rc-switch on Github which has the following example sketch: https://github.com/Martin-Laclaustra/rc-switch/blob/protocollessreceiver/examples/ProtocolAnalyzeDemo/ProtocolAnalyzeDemo.ino

I try to compile the sketch in my Arduino IDE, and I get an error. It turns out the sketch takes advantage of some functionality in the Arduino IDE which is newer than the version I’m using. I am running a Debian desktop and I just installed the arduino packages available on the distribution, but it turns out they’re ancient. I needed an upgrade. But I didn’t want to uninstall the packages and compile from source and then have to remember to maintain that on my desktop host.

That’s when I remembered reading this great blog post from Jessie Frazelle: https://blog.jessfraz.com/post/docker-containers-on-the-desktop/. I would run the latest Arduino IDE in a Docker container on my desktop! I’d already installed Docker a few weeks earlier for fun, so this was a good opportunity to put it to use.

I then found a Dockerfile at https://stackoverflow.com/questions/34017038/running-gui-in-docker-no-ssh-no-vnc which did almost everything I needed. I updated it to work with the appropriate version of the Arduino IDE, which I downloaded from the offficial Arduino website, and used the appropriate serial port so that the Arduino IDE in the container could talk to my Arduino Uno.

It worked perfectly! I was able to compile the sketch and upload it to my Arduino!

Now I was seeing 6 transmissions and rc-switch said each contained the same data (expressed as a decimal value), with the same bit length, and belonging to “Protocol 6” (or the HT6P20B protocol). The rc-switch fork did propose a different protocol, which seemed similar to Protocol 6 but actually had a pulse length of 350 instead of 450.

I wanted to test to see if the data being displayed was actually correct, so I set up the 433mhz transmitter from my friend, and tried out a transmission example from https://www.liwen.id.au/arduino-rf-codes/ with the data I’d collected with the receiver… and I was able to activate the purchased doorbell base!

Now the range on the MX-RM-5V wasn’t very good. I was able to get a distance of about 12 feet or so, but I had to maintain a line of sight between the receiver and doorbell button. So I tried swapping in the more expensive ZW-3102 receiver, and the range improved dramatically. The receiver was able to detect the doorbell signal from the front door of my apartment, which was the goal all along!

At this point, I could just write my code to detect this doorbell and be finished, but I’m curious what it is with the rc-switch fork that makes it work with my doorbell while the upstream rc-switch wouldn’t work. I’ve read the source code a bit, but it’s not completely obvious yet. I think I want to spend some more time on figuring this out.

Another bit of fun was plugging in the raw data from the Arduino output into http://test.sui.li/oszi/. This let me visualise the radio signal. If you were to convert the decimal to binary, you should be able to map the 1s and 0s against the visualisation, which is just plain fun.

I’m really happy with how this project turned out in the end. Once I found the right software library, it turned out to be pretty easy, although I say that without having written my actual receiver code, although that should be straightforward. The hardest part is deciding how I want to handle repeated transmissions. Whether I need all 6 or if I’ll be happy with fewer. I noticed sometimes I only get 5 repetitions on the receiver, so maybe it’s worth having some tolerance.

In the past, I have used an IR receiver to get data, which I could program into my phone, which contains a IR transmitter. That was fun. It’s nice when you can just use your phone to control devices when you can’t find the “real remote”. Likewise, in this case, it’s nice to be able to “do” things on my own terms. When someone presses the doorbell, I could log the data, I could send all kinds of alerts, I could trigger a robot to greet them at the door… the only real limit is my creativity.


Google Protocol Buffers Python Implementation

I vaguely recall hearing about Google’s Protocol Buffers a while ago, but I forgot about them until I recently encountered a project using them. Since I wanted to use the data from the project, it seemed that I would have to learn how to use Protocol Buffers.

After looking at Google developer docs for a while, I settled on the Python tutorial at https://developers.google.com/protocol-buffers/docs/pythontutorial.

I’m working on a Windows 10 computer, but using Ubuntu on Windows so I already had an environment with Python 2.7.x installed.

The tutorial is pretty good, but it makes certain assumptions. I didn’t build the compiler from source. I installed a pre-compiled binary from https://github.com/google/protobuf/releases. This was the file: https://github.com/google/protobuf/releases/download/v3.4.0/protoc-3.4.0-linux-x86_64.zip.

I downloaded the .proto file from the project on which I’m working, and ran ./protoc –python_out OUT_DIR project.proto. That generated the Python code for interacting with that particular data structure.

I tried importing that into my project.py file, but it complained: “ImportError: No module named google.protobuf”. If I had followed the tutorial more closely, I think the assumption is that you’ll build the compiler from source and that you’ll also install your own protobuf runtime libraries. I could’ve done that, but I was lazy so I just installed pip (apt-get install python-pip) and then ran “pip install protobuf”.

According to some Google docs, the runtime library version should be the same as the compiler version, which makes sense. pip had version 3.4.0 which was the same version as the pre-compiled compiler binary I downloaded so that was handy.

Now my Google Protocol Buffer generated Python module is loading, so I’m off to try it out. I think the hardest bit is behind me now.

I’m actually really excited, because the project using the Protocol Buffers is a Java project, but I want a Python tool for interacting with the data from that Java project, and this should work pretty seamlessly. It seems like there are actually a lot of runtime implementations available for Protocol Buffers, so this would be a nice way of sharing data among a number of projects.

I wonder what sort of uptake Protocol Buffers see outside of Google. It seems that Google uses them a lot, but this project is the first time I’ve encountered them in the wild, and I think Protocol Buffers have been in the public domain for about a decade now. In some ways, they’re not as convenient as serializing as JSON or XML, but in other ways they seem a million times better.

I suppose I’ll form my ultimate opinions after I have some experience working with them. I’m intrigued so far though!


Linux Subsystem on Windows 10: Python and Ansible

Last week, using a couple of sets of instructions, I installed the Linux Subsystem on Windows 10. You can find the instructions at https://www.jeffgeerling.com/blog/2017/using-ansible-through-windows-10s-subsystem-linux#comment-6341 and https://msdn.microsoft.com/en-au/commandline/wsl/install_guide.

Since then, I haven’t had much of a chance to play with it. However, I’ve been meaning to use Python more often in my daily work, so I thought it would be fun to write a Python script and run it in “Bash on Ubuntu on Windows”.

But first… I wanted to set up my development environment in a way that would be easy to keep track of. I think it’s really easy to get ahead of ourselves sometimes and just start downloading a million packages using a few different package managers and then we wind up with a system full of stuff that we don’t actually use. Of course, virtual environments and the like can get you around that a bit at a language level, but I like documentation… and I really like Ansible.

Unlike Jeff Geerling in the above instructions, I just ran “apt-get install ansible” to install Ansible via “Bash on Ubuntu on Windows”. I’m not too fussed about getting the most recent version, so the version in Ubuntu’s Xenial repositories from January 2016 (ie 2.0.0.2) suits me fine for experimenting at this point.

At this point, I’ve been using Ansible for years, so I put together a quick little playbook to install the package “python3-mysqldb” and that ran successfully. While Ansible itself uses python2, “Bash on Ubuntu on Windows” comes with python3 out of the box. I’ve used python2 a bit over the years, both for developing Ansible modules and for other Python scripts, but I thought I’d try something new. Plus, if I’m going to be using Python more and more, I may as well use the current version rather than the legacy version of Python.

I don’t have much else to say at this point. If I keep experimenting with “Bash on Ubuntu on Windows”, I’ll make more follow-up posts. Honestly, I should be doing more work directly on Windows, as I want to learn more about that, since I’m already familiar with Linux servers and Linux desktops/laptops from my personal and professional life. But… being able to use Linux from within Windows seems so convenient! Of course, I could be running Python on Windows directly, but Windows often seems like an unpleasant place to work. It feels like it’s more difficult to keep track of things there. But maybe that’s just due to my unfamiliarity with working on Windows as a developer. Maybe I’ll write some Python tools and run them from Windows and from Ubuntu on Windows and see if I can get used to using Windows as a developer…

Bitten by Microsoft Windows 10 Updates

Earlier in the week, when I was turning off my work computer, I selected the “Update and restart” option.

This morning I turned on the computer before commencing my morning routine, so that it would be booted up and ready to go for 9am.

At 9am, I found it was about 12% through the updates, and the screen advised me that it would “take a while”.

Sure enough, in the end, it took about 1.5 hours to install all the updates for Windows 10.

I was overjoyed to finally have access to my desktop…until I noticed the resolution was completely wrong and my dual monitors which are usually extended were actually mirrored.

Readers of this blog may remember that I had to play around with the drivers for the ATI Radeon HD 4250 in this computer: https://tech4lib.wordpress.com/2016/02/03/windows-10-pro-and-legacy-amd-drivers/

So I hit “Win + R”, noticed “devmgmt.msc” was still there from the last time I went through this process, and hit Enter.

As per my blog post from February, I expanded the “Display adapters” section, right-clicked on “ATI Radeon HD 4250”, and noted that “Device status” read that there were no drivers installed. Fun…

Skimming through my old blog post, I switched to the “Microsoft Basic Adapter”, which in hindsight I probably didn’t need to do but I’m documenting here anyway since I did it. In Device Manager, I noticed my “ATI Radeon HD 4250” adapter had been replaced with “Microsoft Basic Adapter”.

Then I re-ran the executable “13-1-legacy_vista_win7_win8_64_dd_ccc.exe” which was still in my Download directory from February. It said that the ADMD Catalyst Control Centre was already installed, but that it would happily install it again if I clicked the button.

Moments pass, my monitors flicker, and voila! My extended display is back! I went back into Device Manager, noticed that “ATI Radeon HD 4250” was back as the Display adapter, and reviewed the Events tab.

  • 9:21: Device install requested
  • 9:22: Device install requested
  • 9:24: Device migrated
  • 9:24: Device installed (c0296217.inf)
  • 10:14: Driver service added (BasicDisplay)
  • 10:14: Device installed (display.inf)
  • 10:16: Driver service added (amdkmdap)
  • 10:16: Driver service added (amdkmdap)
  • 10:16: Driver service added (AMD External Ev…)
  • 10:16: Device installed (c8160540.inf)

Looking back at the blog post from February, that’s pretty much exactly what happened back then too.

I couldn’t find c0296217.inf on my system, so no wonder Device Manager said there was no driver installed. And c8160540.inf can be found at C:\AMD\Support\13-1-legacy_vista_win7_win8_64_dd_ccc\Packages\Drivers\Display\W86A_INF\C8160540.inf

I’m certainly no pro when it comes to drivers and hardware, but I’m glad that I was able to make it work again!

I have another work system which has some third-party driver adapter drivers, and Windows Updates almost always cause them to be uninstalled, and then I have to re-install them to re-gain the desired dual-monitor functionality.

In any case, I can finally start work this morning…

Troubleshooting network adapters on Windows

We all love the Internet and connectivity, but how often do we think about “how” we connect?

At work, I use a Windows PC, which has a physical Ethernet network adapter and a physical WiFi network adapter. Typically, I just use the Ethernet adapter, as it’s faster. I don’t need my desktop to use WiFi, unless I’m having to manage something on our wireless network. I recently noticed the desktop also has a Bluetooth adapter, but I haven’t used that yet, although an increasing interest in the Internet of Things means that I might start to use it soon!

In any case, that’s 3 network adapters. Already it’s starting to sound like a lot. But I also have a host-only virtual adapter for Virtualbox, so that I can have a private connection with my Virtualbox virtual machines. That’s 4 adapters now.

I also use a USB Maxon Modmax modem with a SIM card for connecting to a private network. That’s 5 adapters.

Recently, I’ve also started to use VMware on the same PC. VMware installs another 2 virtual adapters (host-only and NAT). That’s 7 adapters.

After installing VMware, I started to have issues with the USB modem, so I disabled those adapters, and everything was fine…

…until I wanted to use the USB modem in the VMware virtual machines, and to do that I needed the VMware virtual NAT adapter. So I tried that again and had the following result: “C-motech UI Main has stopped working.”

c-motech-crash

The Modmax connection would stay active until I dealt with that C-motech UI Main window. As soon as I clicked “Debug”, “Close program” or “X”, it was all over.

So I could have my VMware adapter and Modmax adapter enabled and achieve the network functionality I required… but I was blighted by this pop-up window that I had to try and hide on my screen. This wasn’t going to be a long-term thing I wanted to live with.


I called Maxon technical support to see if they had any insight, but they didn’t. The Modmax was also end-of-life years ago, so they weren’t going to work on troubleshooting it too thoroughly, which was fair enough.

So I decided to experiment a bit by disabling some other adapters and trying again… and voila it worked! I realized that the Modmax modem would work, so long as there was a maximum of 5 enabled network adapters (including its own adapter).

I can’t explain why this is the case. I’m guessing it’s a bug in the Modmax Connection Manager, but maybe Windows has some secret limitation… who knows? At the end, it matters that it works.

I rang Maxon back up to share my discovery, and that’s that. I’m writing this post in the event that someone else is Googling “C-motech UI Main has stopped working”. Hopefully my efforts will help them avoid this crash!

Getting started with Arduino

I think I first heard about Arduino in 2012. I was studying for my masters in library and information studies, and I was working as a systems librarian. While I found the idea of working with hardware interesting, my main focus was software and servers.

But in 2015 an engineer I know gave me an Arduino Uno. Not knowing what to do with it, I put it in a drawer until 2016 when I taught myself C, read an official tutorial online, and discovered my printer’s USB-B to USB-A cable could be used to provide power and code for the board.

I stated with the blink tutorial then made it send a SOS signal with the on board LED. Then another engineer challenged me to dim a LED he gave me, so I plugged it into the board (without a resistor which is naughty but worked fine), and started playing with PWM (pulse width modulation).

I was running out of things I could do, so I started reading as much as I could. I thought about sourcing a breadboard, LEDs, LCDs, piezos, pots, push buttons, motors, etc. I realised though that it would be faster, easier, and probably cheaper just to buy an Arduino Starter Kit.

A few days later, it arrived and I examined all my goodies. To date, I’ve only had time for the first two projects, which are just about using switches to light up LEDs. But I’m looking forward to playing with the motors, LCD, piezo, temperature sensor, pots, and photosensitive resisters with the other projects.

I like the idea of home automation. A robot greeter using PIR (passive infrared) motion detectors; using Bluetooth to signal my arrival home and kick off some automated processes like phone backups; using IR to signal household devices instead of using lots of different remotes. If the temperature drops, turn on a heater; hacking a doorbell to alert a device which sends me an email or turns on a door cam to see who is there.

I’d like to fit a 3G module to a board so that I could communicate with it remotely, but I don’t know what my device would need to do remotely. Such devices are useful to government and corporations, but what use are they to an individual? I suppose if I was a farmer, it could be used for measuring rainfall or temperature. I suppose you could make a long-range robot. A 3G module enables so much more physical freedom than a device controlled by Bluetooth or WiFi.

But what does all this have to do with libraries? You could use an Arduino or Raspberry Pi to make your own self-checkout or security gate, but those products already exist.

I figure my newfound knowledge of electronics would be of more use in a library makerspace.

I sometimes wonder why we have makerspaces in libraries, but it seems a natural evolution. Libraries have traditionally been about the mental world, but now they’re branching out into the physical world too. Marrying the two together with information resources and physical tools.

Most of my project ideas are for home, but I’m sure people have all sorts of ideas for their art, their businesses, their inventions, their own diverse lives.

I think libraries provide a collection of specialized resources we couldn’t afford ourselves, and they also serve as a place for expanding our collective knowledge and skills. As we become digital citizens, we should become closer to the art and craft that comprises our world.

Politicians talk about innovation… and I reckon that’s how you do it. You make spaces for information exchange and promote creativity.

Anyway, I’m just getting started with Arduino, but I’m excited by where I’m going.

Lessons in C: teaching myself pointers and pointer arithmetic

First of all, I love the openness of open source. When you’re a curious person, you’re able to actually find the reasons why the tools you’re using behave in the way that they do. 
Second, I love that I can decide to teach myself how to program in C, and then just go off and do it. The Internet is a wonderful resource, basic hardware is available cheaply, and free software like the free GNU Compiler Collection (GCC) means that you can code without opening your wallet.
 
Long story short, I was writing a C function to read arbitrarily long lines from a file (ie a function to automatically reallocate memory to the buffer as needed whilst reading from the file), and the snippets I was looking at online showed that people were doing things like “fgets(buffer + last, length, file)”. I found “buffer + last” to be utterly confusing.
 
“last” is an integer while “buffer” is a char pointer, which starts to make sense when you look into pointer arithmetic and the fgets source code: http://mirror.fsf.org/pmon2000/3.x/src/lib/libc/fgets.c
 
It all seemed straight forward enough to me except for two lines:
 
*p++ = c;
*p = 0;
 
“c”is a character obtained from a file via fgetc, and “p” is a copy of the buffer pointer.
 
It was clear that “*p++ = c;” was adding the “c” character onto the character array, but how? Well, according to the order of operations, it was really doing “*p = c; p++”, which meant it was dereferencing the “p” pointer and assigning the c variable value to that memory location. Then, it was changing the pointer to point to the next memory address.
 
That’s where *p = 0 comes in. We’ve moved on to the next address via that last “p++” so now we’re setting the next bit of memory to 0, which – if we look at our ascii table at http://www.asciitable.com/ – is decimal for NULL. Since C strings are null terminated, we’re indicating that’s the end of our string.
 
I found it confusing that when I printed “buffer” after the fgets() that it was showing the full string since I thought that I had moved the pointer to a different memory address, but then I realized it was actually the “p” pointer which had been subject to the pointer arithmetic and not the original “buffer” pointer. Of course “buffer” was still pointing to the same place, which allowed me to read the whole string out of the buffer, rather than just the last character assigned.
Now I understand how my C program is reading lines of arbitrary length from a file and printing them out in the terminal window.
With the help of “Valgrind”, I can also see that I’m not leaking memory as well, as I’m making sure to free() my pointers where needed. Really like Valgrind actually, as it also points out other mistakes which don’t necessarily lead to segfaults and such.
Now if I were really keen, I could probably optimise how much memory is reallocated when reading really long lines (in better ways than how others describe online), but there’s probably better ways to spend one’s time.
Now that I better understand pointers, pointer arithmetic, strings, and reading from files, I could in theory create a library for handling MARC records in C, or I could make a really basic encryption program, or both! At the very least, I’ll have a better understanding of how to read the source code of the Zebra indexing engine used by the Koha LMS. In fact, at this point, I might be able to start contributing patches to Zebra!
When I started working on Koha back in 2012, I had never coded in Perl. I had never used Template Toolkit. I had never used Git. I thought Zebra was just an animal, and that Apache referred to helicopters and some people indigenous to America. Now I can use these tools in my sleep. Considering that Perl, Git, and Zebra are all written in C, perhaps this is the next step in understanding those tools, how best to use them, how to fix them, and how to improve them.

Windows 10 Pro and Legacy AMD Drivers

[Preface: I got Windows 10 Pro to detect dual monitors with a AMD ATI Radeon HD 4250 graphic card, which AMD and most other people will say you can’t do.]

Apologies to librarians reading the blog, as I’ve been in a much more technical place lately, but maybe you’ll find the following useful too.

Recently, I’ve been putting together a computer (with a AMD Phenom(tm) II X6 1055T processor) at work, which my boss is going to send home with me, so that I can work remotely from home.

It already had Windows 8.1 running fine on it, but we decided to upgrade to Windows 10 just to be as up-to-date as possible. We packed up the drive with Windows 8.1, cloned Windows 10 onto another drive, plugged it into the machine, turned it on, and wished for the best.

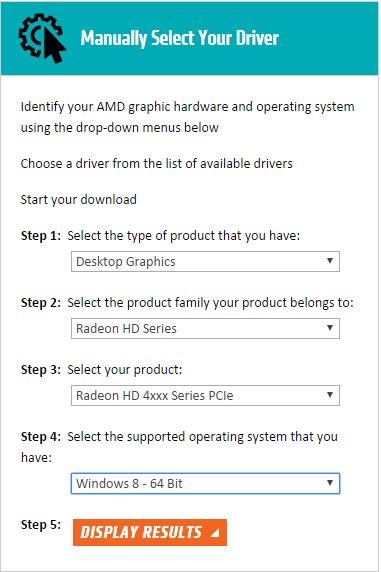
Everything seemed to come up fine, but the display was being duplicated rather than extended across 2 monitors. After booting into Windows 10, the computer also said that it was missing AMD graphical drivers. I’d encountered a similar problem in the past, so I hopped onto AMD’s website (http://support.amd.com/en-us/download), and noticed that they didn’t have any up-to-date drivers for Windows 10 for their ATI Radeon HD 4xxx series. The last Windows operating system I found supported was Windows 8. See the below image for what criteria I used on the AMD website.

amd_download

The more I read online, the more dire it seemed to be. Most people said that you were up the creek without a paddle… some people gave suggestions which didn’t work… and at the end of it all… I figured I’d have a crack at it myself.

I downloaded the AMD driver auto-detect tool, and it said it couldn’t find any drivers for my system. I’d seen such things before and figured I’d discount this as the auto-detect isn’t great.

I downloaded the Radeon HD 4xxx Series PCIe drivers I could find (as you can see in the image above), which claimed to work with Windows Vista, Windows 7, and Windows 8. They came bundled up in an installer (13-1-legacy_vista_win7_win8_64_dd_ccc.exe), so I downloaded the whole thing, and tried installing that and restarting

No luck.

I tried uninstalling the AMD Catalyst Control Center (ie the “ccc” from the .exe installer), restarting, re-installing, restarting… no luck.

I pressed “Win + R” to get a Run prompt, typed in “devmgmt.msc” to get the device manager up. I expanded the “Display adapters” which listed the AMD ATI Radeon HD 4250 device, right-clicked and clicked on Properties, and went to the “Driver” tab.

There I clicked “Update Driver…”, “Browse my computer for driver software”, “Let me pick from a list of device drivers on my computer”, chose “Microsoft Basic Display Adapter”, and clicked “Next”. I restarted the computer, and… it still wasn’t detecting my second monitor.

So I tried uninstalling the AMD Catalyst Control Center again, restarting, reinstalling… and this time I got an extra pop-up during the process. It claimed to be from”Advanced Micro Devices” (ie AMD) and related to the display, so I clicked install, and went back to my existing workstation… when out of the corner of my eye I saw the two monitors flicker. I focused on them and noticed that they were now extended and not duplicated!

I rushed over to the computer and found that AMD Catalyst Control Center didn’t appear to install correctly, but the computer now recognized the second monitor!

I often say that technology isn’t magic, but it seemed like magic!

So I went back to “devmgmt.msc”, went back to the properties for the Display adapter, and clicked on the “Events” tab. It displayed a history of driver installations for the day, and I noticed in the morning that it had installed “c0296217.inf” about 4 times. Then it added “Driver Service added (BasicDisplay)” and “Device installed display.inf”, which would’ve been the “Microsoft Basic Display Adapter”. Then… the final few entries said “Driver service added amdkmdag”, “Driver service added amdkmdag”, “Driver service added (AMD External Events Utility)”, “Device installed (c8160540.inf)”.

It wasn’t magic after all. Rather, the installer had used a different driver the final time! I searched C:\AMD for “c8160540.inf” and sure enough I found it at C:\AMD\Support\13-1-legacy_vista_win7_win8_64_dd_ccc\Packages\Drivers\Display\W86A_INF\C8160540.

I tried searching for “c0296217.inf” but I couldn’t find it in the C:\AMD directory. My guess… is that when I was trying to install the AMD Catalyst Control Center… it must’ve been using drivers that were already existing on the system. Even though the drivers didn’t work… it tried the pre-existing bad ones before it used the good new one that it had packaged with itself. Now that’s 100% a guess, but it’s clear that the final driver that works was one that I had downloaded with the 13.1 installer.

I wish I knew more about the overall process, but in the end I got my desired result, and that’s what matters most at the moment. Hurray for getting Windows 10 Pro to work on that machine with dual monitors! Also… hurray for being able to use remote desktop connection with dual monitors!

Now to pack up the hardware and get it home, and… spend the next 3 hours doing everything that I was originally going to do in 7.5 hours today.

Little victories…

Edit (22/05/2018):

Every Windows Update uninstalls the working AMD drive with either a generic driver or a newer AMD driver which doesn’t work. Here’s a little reminder to myself (and others) that this is the particular Driver Date and Driver Version which works with the ATI Radeon HD 4250 (at least on this computer).
driver-that-works

The lie that is listen(2)

I encountered a rather crazy-making problem today…

If you read the documentation for listen(2) on Linux or listen() in Perl, it’ll say that the listener will accept new connections up to a maximum specified by a “backlog” integer.

But that’s a lie.

When I tried it today on Linux 3.16.7, I found that it actually accepted new connections up to N + 1.

This in contrast to most of the information online which says that Linux uses a “fudge factor” of N + 3.

People get this idea from the book “UNIX Network Programming” by Richard Stevens, which specified that all sorts of different systems had different fudge factors, and that Linux 2.4.7 had a fudge factor of N + 3.

Well, we’re not using 2.4.7 anymore, but the majority of the information online – even more modern sources like forums and blogs – continue to say N + 3.

So I Googled like a demon, and I found someone else talking about this exact same topic: http://marc.info/?l=linux-netdev&m=135033662527359&w=2

Indeed, starting from Linux 2.6.21, it seems that it became N + 1 (https://lkml.org/lkml/2007/3/6/565). You can even see it in the stable Linux git repository: http://git.kernel.org/cgit/linux/kernel/git/stable/linux-stable.git/commit/?id=64a146513f8f12ba204b7bf5cb7e9505594ead42

Although before I found that info, I started wondering if Perl was tampering with my listen() backlog… so I started looking at https://github.com/Perl/perl5/blob/blead/pp_sys.c#L2614 and https://github.com/Perl/perl5/blob/blead/iperlsys.h#L1323, but quickly found my knowledge of C and Perl’s internals to be wanting.

At the end of the day, the behaviour doesn’t matter too much for my project, but it’s nice to know the reason why it’s N + 1 and not N + 3.

It also makes you think a bit about truth, documentation, and the Internet.

Programmers should know that you can’t always trust documentation. Sometimes, you have to go to the source code to actually figure out what’s going on. In this case, I probably could have shrugged my shoulders and made a comment saying “the backlog is N + 1 rather than N or N + 3 because reasons”, but that’s not very helpful to the next person who comes along and experiences N or N + 3 when they’re using a different kernel.

Anyway, that’s my last post for 2015. Hopefully it helps someone out there in the wild who is tearing their hair out wondering why the listen(2) backlog is N + 1 and not N or N + 3. Of course, by the time you’re reading this, the kernel may have changed yet again!